How to Install and Configure Cygwin: Difference between revisions
(Created page with "Category:Sapelo2Category:Teaching __TOC__ ==Introduction== [https://cygwin.com/ Cygwin] is a large collection of GNU and Open Source tools which provide functionalit...") |
No edit summary |
||
| Line 21: | Line 21: | ||
A window will appear in the middle of your screen that says “Do you want to allow this app from an unknown publisher to make changes to your device?” Click “Yes.” | A window will appear in the middle of your screen that says “Do you want to allow this app from an unknown publisher to make changes to your device?” Click “Yes.” | ||
In the Cygwin Setup window that appears, click | In the Cygwin Setup window that appears, click “Next," leave the "Install from Local Directory" radio button selected. | ||
Click "Next" once more, and leave the default install location for all users. | |||
Click "Next" once more to confirm the default location of the downloaded installer. Next you'll see the following screen: | |||
[[File:Cygwin2.png]] | [[File:Cygwin2.png]] | ||
Latest revision as of 13:28, 5 May 2020
Introduction
Cygwin is a large collection of GNU and Open Source tools which provide functionality similar to a Linux distribution on Windows. Cygwin does not come with the text editor nano by default. Please follow the instructions here to install Cygwin with nano. If you have already installed Cygwin, just run the installer again following these instructions, and you will be able to use nano in Cygwin.
Please note, these screenshots may become out of date as newer versions of Cygwin are released.
Downloading Cygwin
Go to https://cygwin.com/install.html and select the “setup-x86_64.exe” link near the top of the page.
Installing and Configuring Cygwin
Click the installer that will appear in the bottom left of your browser.
A window will appear in the middle of your screen that says “Do you want to allow this app from an unknown publisher to make changes to your device?” Click “Yes.”
In the Cygwin Setup window that appears, click “Next," leave the "Install from Local Directory" radio button selected.
Click "Next" once more, and leave the default install location for all users.
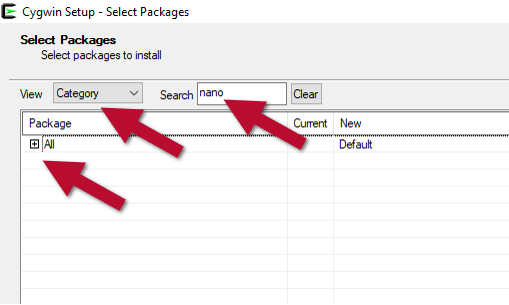
Click "Next" once more to confirm the default location of the downloaded installer. Next you'll see the following screen:
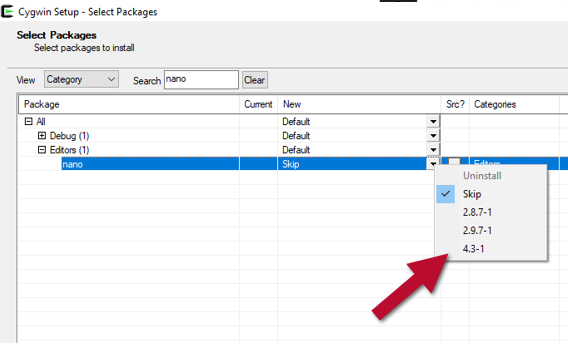
Make sure “Category” is selected in the View drop-down menu. Type nano in the search bar. Click the plus sign to expand "All" and "Editors." Click the drop-down arrow next to "Skip" and select the latest version.
Lastly, click "Next" two more times, then click "Finish."


