Globus: Difference between revisions
No edit summary |
|||
| (53 intermediate revisions by 5 users not shown) | |||
| Line 1: | Line 1: | ||
===Introduction=== | ===Introduction=== | ||
The GACRC, on behalf of UGA, recently procured an institutional | The GACRC, on behalf of UGA, recently procured an institutional subscription to Globus for secure, reliable management of UGA's research data. | ||
Globus is a high-performance data-transfer platform that allows you to perform and/or automate: | Globus is a high-performance data-transfer platform that allows you to perform and/or automate: | ||
*Data transfers between servers in your group. | *Data transfers between servers in your group. | ||
*Data transfers between a server and your laptop. | *Data transfers between a server and your laptop. | ||
*Sharing data with researchers at other institutions. | *Sharing data with researchers at UGA and at other institutions. | ||
*Sharing data with the world. | *Sharing data with the world. | ||
Data transfers happen unattended and are faster than SCP/SFTP, data verification is on by default, and automatic restarts or continuation of transfers happen after a disruption. | Data transfers happen unattended and are faster than SCP/SFTP, data verification is on by default, and automatic restarts or continuation of transfers happen after a disruption. A video introduction to Globus at UGA can be found '''[https://kaltura.uga.edu/media/t/1_vlprwoc7/176125031 here]'''. | ||
---- | |||
[[#top|Back to Top]] | |||
===Getting Started=== | ===Getting Started=== | ||
| Line 42: | Line 45: | ||
Globus Connect: software used to create an endpoint. | Globus Connect: software used to create an endpoint. | ||
--> | --> | ||
---- | |||
[[#top|Back to Top]] | |||
===Access GACRC Storage=== | ===Access GACRC Storage=== | ||
GACRC maintains a '''UGA GACRC Collection''' that can be used to access the Sapelo2 /home, /scratch, /work, and /project file systems. | GACRC maintains a '''UGA GACRC Collection''' that can be used to access and transfer files in and out of the Sapelo2 /home, /scratch, /work, and /project file systems. | ||
After you have logged in to Globus, click the '''File Manager''' link at the top-left of the window. | After you have logged in to Globus, click the '''File Manager''' link at the top-left of the window. | ||
| Line 54: | Line 60: | ||
Select the '''UGA GACRC Collection''' and authenticate with SSO to access your files on Sapelo2. | Select the '''UGA GACRC Collection''' and authenticate with SSO to access your files on Sapelo2. By default, you will open your home directory on Sapelo2. For example: | ||
[[File:Globus-sapelo2-home.png|border|900x900px]] | |||
To access your /scratch or /project areas, enter the full path in the '''Path''' field under the '''Collection''' name (for example, enter /project/abclab) and then press the Enter or Return key on your keyboard for the change in the path to take effect. | |||
---- | |||
[[#top|Back to Top]] | |||
===Transfer Data Between GACRC Storage and Desktops/Laptops=== | ===Transfer Data Between GACRC Storage and Desktops/Laptops=== | ||
There are two ways to use Globus to transfer files between a GACRC storage and desktops or laptops. The method that is best suited depends on the number and size of the files to be transferred. In both cases you would use a browser to Login into https://www.globus.org, as described above, and open the UGA GACRC Collection in the File Manager panel. | |||
====Small number of files or small sizes downloaded or uploaded==== | |||
'''Uploads''' - Once you open the UGA GACRC Collection in the File Manager panel, you can select the "Upload" button to upload a file from your local machine to the UGA GACRC Collection, to the path you select (e.g. your Sapelo2 /scratch dir). | |||
'''Downloads''' - Once you open the UGA GACRC Collection in the File Manager panel, you can navigate to the directory where the files are located and select the files you want to download. Then select the "Download" button to download the file(s) to your local machine. | |||
Here is a sample screenshot to download a file called analysis.txt from the user's home directory on Sapelo2 to the local machine: | |||
[[File:Globus-sapelo2-download-file.png|border|900x900px]] | |||
'''File Size Limitations''' - While Globus itself does not impose strict limits on file sizes, some web browsers may have upload limits, typically around 1-2 GB. If you attempt to upload files larger than 1 GB, you may encounter issues with data transfer. For larger file transfers, it is recommended to use Globus Connect Personal (GCP) instead of the web browser interface, as GCP handles larger files more efficiently. Please refer to the instructions in the '''Many Files or Large Files''' section below. | |||
You do not need to install Globus Connect Personal on your local machine in order to use the Download and Upload features, to transfer files from e.g. the UGA GACRC Collection to your local machine. Please note that not all Collections have the Download and Upload feature. If this feature is not available, you can follow the instructions in the '''Many files or large files''' section below. | |||
====Many files or large files==== | ====Many files or large files==== | ||
Install Globus Connect Personal (GCP) and create a Globus endpoint on your local machine. Globus Connect Personal allows faster and more reliable file transfers. Information on how to install GCP on your local machine and create an endpoint are available on the [[Globus Connect Personal|'''Globus Connect Personal''']] page. | |||
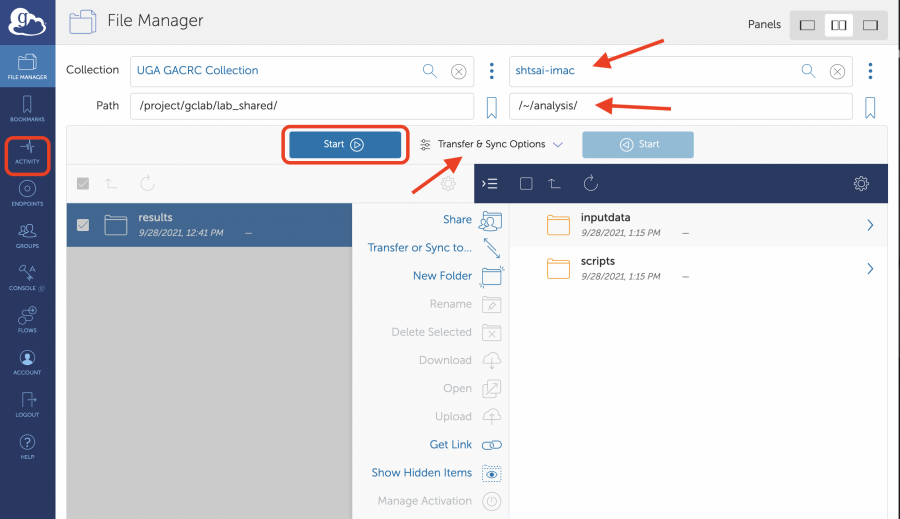
Once you have installed GCP and created an endpoint on your local machine, navigate to the UGA GACRC Collection in the File Manager panel, select the files or directories you wish to transfer, and click on the double panel icon (top right), as illustrated here: | |||
[[File:Globus-UGA-GACRC-collection-filetransfer1.png|border|900x900px]] | |||
On the right panel, enter the name of the Collection on your endpoint (e.g. called shtsai-imac in this example) and select the path where to transfer the data to (or from). By default, file integrity will be checked after the transfer is completed. You can enable other options (e.g. file encryption on transfer) by opening the '''Transfer & Sync Options''' menu and selecting the options you wish to use. Once all the settings are chosen, and you are ready to perform the file transfer, click on the '''Start''' button. You can check the status of the transfer by going to the Activity panel. | |||
[[File:Globus-UGA-GACRC-collection-filetransfer2.png|border|900x900px]] | |||
====Transfer files from/to an external hard drive==== | |||
It is possible to use Globus to transfer files between an external hard drive connected to your local machine and another system, such as a GACRC storage area. The first step is to install Globus Connect Personal (GCP) on your local machine. Information on how to install GCP on your local machine and create an endpoint are available on the [[Globus Connect Personal|'''Globus Connect Personal''']] page. | |||
After you connect your external hard drive to your computer, you will need to add it to the list of Accessible Folders within the Globus Connect Personal application. Documentation on how to do that from Window and Mac are at | |||
https://docs.globus.org/how-to/globus-connect-personal-windows/#configuration | |||
https://docs.globus.org/how-to/globus-connect-personal-mac/#configuration | |||
Then you should be able to transfer files from the external drive to a GACRC storage (or vice-versa) via Globus. | |||
====Transferring files between Sapelo2 file systems==== | ====Transferring files between Sapelo2 file systems==== | ||
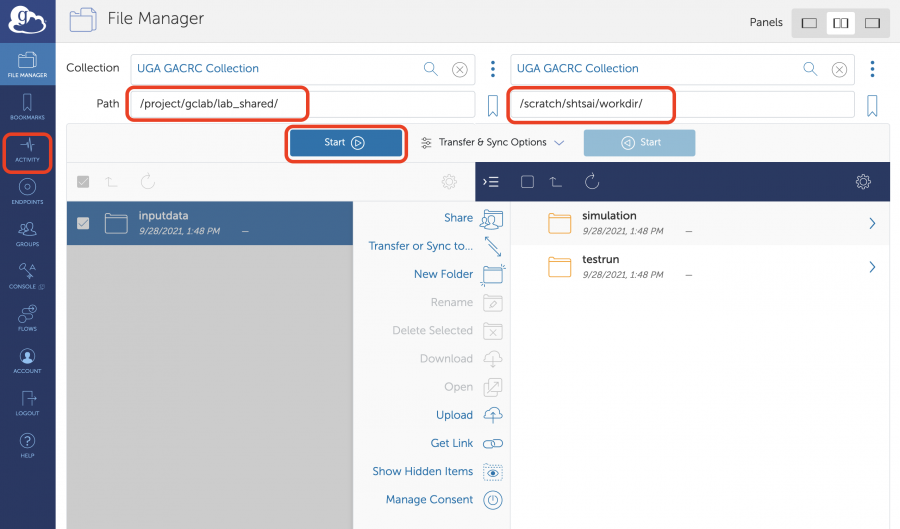
To transfer files between two files systems on Sapelo2, navigate to the File Manager two-panel view, and select UGA GACRC Collection on both panels. Enter the path to the location of the files on one panel (e.g. your /project directory) and the location where you want to transfer the file to on the other panel (e.g. your /scratch directory). Select the files to transfer and click '''Start'''. You can check a report of the transfer by going to the Activity panel. | |||
Here is an example where a directory called inputdata is transferred from a /project directory to a /scratch directory: | |||
[[File:Globus-filetransfer-project-scratch.png|border|900x900px]] | |||
---- | |||
[[#top|Back to Top]] | |||
===Access Storage Not Hosted by GACRC=== | ===Access Storage Not Hosted by GACRC=== | ||
Globus can be used to access, share, transfer, or manage data stored on devices outside of the GACRC. | Globus can be used to access, share, transfer, or manage data stored on devices outside of the GACRC. The steps described above can also be used to access and transfer data from any endpoint that has been shared with you (for example, shared by a collaborator in another institution). You can either search for an endpoint in the '''File Manager''' panel, or go to the '''Endpoints''' panel and select '''Shared with you''' to see a list of Collections shared with you. | ||
''' | You can transfer files into your Sapelo2 file systems by using the '''UGA GACRC Collection''' and selecting the appropriate directory (e.g. your /home, /scratch, or /project directories). | ||
===Access Shared Data=== | |||
Collaborators can share data with you by sharing a Collection or an endpoint with you. The shared Collection/Endpoint can be on another institution, on a desktop or laptop, or on their GACRC storage. Once you login into https://www.globus.org, you can view all Collections/Endpoints shared with you by clicking on '''Endpoints''' on the left side of the page and then open the '''Shared with you''' tab. A list of endpoints that have been shared with you will be listed on the page. | |||
===Documentation=== | You can transfer data from shared endpoints to you desktop or laptop, or directly into your GACRC storage (e.g. your /scratch area or your group's /project area). You can transfer files into your Sapelo2 file systems by using the '''UGA GACRC Collection''' and selecting the appropriate directory (e.g. your /home, /scratch, or /project directories). | ||
---- | |||
[[#top|Back to Top]] | |||
===Sharing Data=== | |||
Globus can be used to share data from your local machine or your GACRC /project area. | |||
====Sharing data from GACRC storage (/project)==== | |||
You can allow collaborators to download or transfer files from your /project area into their local endpoints/collections or into their GACRC storage space in the UGA GACRC Collection. Your collaborators do not have to be associated with an institution that has a Globus subscription. They can login into https:///www.globus.org using a Globus ID, a Google Account, an ORCID ID, or with their institutional account if their institution has a Globus subscription. | |||
Steps to share a /project folder with a collaborator: | |||
1. In the '''File Manager''' panel, open the '''UGA GACRC Project Sharing''' collection. | |||
2. Navigate to the folder you wish to share (e.g. /project/abclab/shareddir) and select it. | |||
3. Select '''Share''' and create a guest collection. | |||
4. Add permissions to share the collection with your collaborators (they will need to have a Globus account, as indicated above). | |||
Note that your collaborators will not be able to transfer files into your shared Collection on /project, even if you choose to add '''write''' permission while sharing the Collection. | |||
If you would like your collaborators to transfer data into your GACRC storage for you to use on the cluster, please contact GACRC and we will set up a space where they can write into. | |||
To obtain the data you shared with them, your collaborators can do as follows: | |||
a. If you are only sharing a few small files, they can navigate to the File Manager panel in the Globus page (available after they login into https:///www.globus.org), open the collection you shared with them, select the files and use the Download option. | |||
b. To copy large files or a larger number of files to their desktop or laptop, they should install [[Globus Connect Personal|'''Globus Connect Personal]] on their local machine. | |||
c. If your collaborators are GACRC users, they can transfer the data into their GACRC storage, using the UGA GACRC Collection. This use case does not require that they install Globus Connect Personal on their local machine. | |||
====Sharing data from your desktop or laptop==== | |||
If you have a need to share data from your desktop or laptop using a Globus Connect Personal collection, please request to join the University of Georgia Standard (HA) Globus subscription with these steps. Note this is not required for normal Collections/Endpoints provided by GACRC. | |||
*Click on Settings | |||
*Choose the Subscriptions tab | |||
*Click "Find a Subscription" and choose University of Georgia Standard (HA) | |||
*Fill out the information and submit your application | |||
Once your request is approved, Globus Plus will allow you to create shared links to your own Globus Connect Personal client. These are also known as guest collections. Please note that if you allow write access to your Collection, your local hard drive can be inadvertently filled or files stored there could be deleted. Please see the [[Globus Connect Personal|'''Globus Connect Personal''']] page for more information. | |||
If you don't have a collection set up on your local computer yet, please first set one up following the steps detailed [[Globus Connect Personal|here]]. | |||
Make sure that your collection on your local computer is set to be "shareable" with the following steps: | |||
*Open the Globus Connect Personal application | |||
*Click Preferences > Access | |||
*Check the box under "Shareable" next to your user directory (i.e. /Users/yourname) | |||
====Sharing data from a multi-user system==== | |||
If the data are stored (or will be stored) on a multi-user system, you can install [https://docs.globus.org/globus-connect-server/v5.4/ '''Globus Connect Server'''] and create an endpoint on this system. Please contact GACRC to request that your endpoint be associated with UGA's Globus subscription. Once your endpoint is listed in UGA's subscription, you will be able to share it. | |||
---- | |||
[[#top|Back to Top]] | |||
===Summary of Collections on GACRC storage=== | |||
*'''UGA GACRC Collection (All GACRC filesystems) – GACRC Users Only''': This collection allows you to access data on your Sapelo2 /home and /scratch directories, as well as your group's /work and /project areas. You can use the Upload and Download features (recommended for a few small files) or transfer large files and/or a large number of files from/to a different endpoint. | |||
*'''UGA GACRC Project Sharing (Read Only)''': You can use this collection to share a directory with a collaborator. The data to the shared needs to reside in your group's /project folder and you can select a directory to create a shared collection. Anyone with whom you share the collection will be able to copy the shared files (even if the files don't have Unix read permission open for group or for others), but they will not be able to write into your shared collection. | |||
*'''UGA GACRC read-write Sharing''': This collection has read-write access to allow external (to UGA) users to upload data to GACRC storage for a UGA user. Please contact GACRC if your external collaborator needs to upload data onto GACRC storage for you to use ('''upon request, GACRC staff will configure a space for you'''). | |||
---- | |||
[[#top|Back to Top]] | |||
===Globus Command Line Interface=== | |||
The Globus Command Line Interface (CLI) provides an interface to Globus services from the shell, and is suited to both interactive and simple scripting use cases. The CLI can be used to integrate Globus actions into your scripts to automate your data flows. | |||
To use it on Sapelo2, you need to load the module first, for example, to use version 2.1.0, load the module with | |||
<pre class="gcommand"> | |||
ml Globus-CLI/2.1.0-GCCcore-8.3.0 | |||
</pre> | |||
For more information, please see the [[Globus-CLI]] page. | |||
---- | |||
[[#top|Back to Top]] | |||
=== Documentation=== | |||
[https://docs.globus.org/ Official Globus Documentation] | [https://docs.globus.org/ Official Globus Documentation] | ||
| Line 85: | Line 234: | ||
[https://docs.globus.org/how-to/ How-to] | [https://docs.globus.org/how-to/ How-to] | ||
[https://docs.globus.org/faq/ FAQs] | |||
[https://docs.globus.org/how-to/get-started/ How to get started] | |||
[https://docs.globus.org/how-to/share-files/ How to share data using Globus] | |||
[https://www.youtube.com/channel/UCIuyIEG3U5wla7fV7u4dTdQ Globus youtube channel] | |||
Revision as of 08:01, 9 October 2024
Introduction
The GACRC, on behalf of UGA, recently procured an institutional subscription to Globus for secure, reliable management of UGA's research data. Globus is a high-performance data-transfer platform that allows you to perform and/or automate:
- Data transfers between servers in your group.
- Data transfers between a server and your laptop.
- Sharing data with researchers at UGA and at other institutions.
- Sharing data with the world.
Data transfers happen unattended and are faster than SCP/SFTP, data verification is on by default, and automatic restarts or continuation of transfers happen after a disruption. A video introduction to Globus at UGA can be found here.
Getting Started
If you are a first time user of Globus, you will need to create an Identity Account. At a minimum you will need to setup your identity using the University of Georgia organizational login in order to access UGA systems.
- Go to https://www.globus.org and choose Login in the upper right corner.
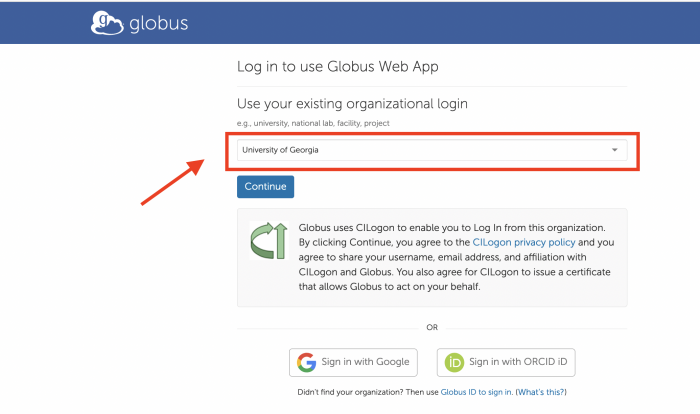
- Search for University of Georgia in the “Use your existing organizational login" box.
- Choose continue and you will be forwarded to a UGA Single Sign-On (SSO) login page. You will also need to authenticate with Duo (two-factor authentication).
When you login for the first time using an existing organization login associated to UGA:
- Globus will ask if you would like to link to an existing account. If you have already used another account with Globus in the past, you can choose "Link to an existing account". Otherwise, click "Continue" to proceed.
- You will need to accept Globus Terms of Service and Privacy Policy and click Continue to proceed.
- You will need to give Globus permission to use your identity to access information and perform actions (like file transfers) on your behalf.
These 3 steps will not be prompted after your first login.
Detailed information with screenshots are provided by Globus at their Getting Started page.
Access GACRC Storage
GACRC maintains a UGA GACRC Collection that can be used to access and transfer files in and out of the Sapelo2 /home, /scratch, /work, and /project file systems.
After you have logged in to Globus, click the File Manager link at the top-left of the window.
In the Collection search box, enter GACRC and you should see UGA GACRC Collection in the list.
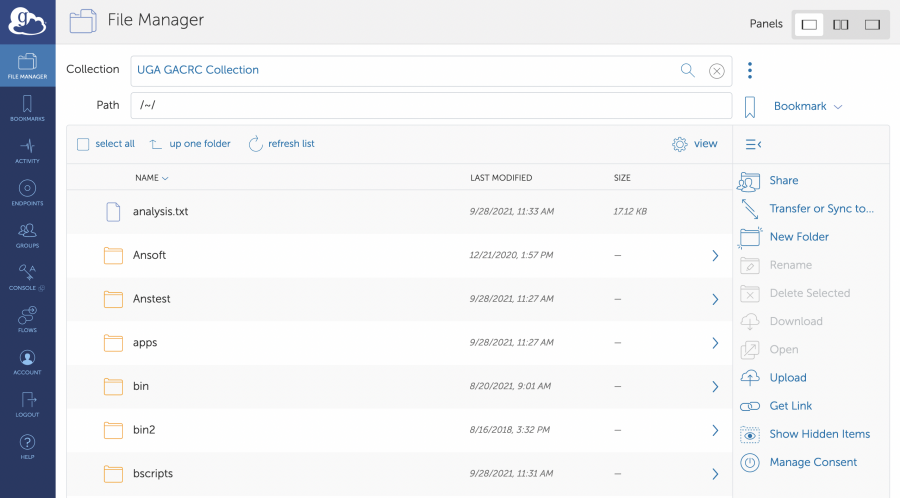
Select the UGA GACRC Collection and authenticate with SSO to access your files on Sapelo2. By default, you will open your home directory on Sapelo2. For example:
To access your /scratch or /project areas, enter the full path in the Path field under the Collection name (for example, enter /project/abclab) and then press the Enter or Return key on your keyboard for the change in the path to take effect.
Transfer Data Between GACRC Storage and Desktops/Laptops
There are two ways to use Globus to transfer files between a GACRC storage and desktops or laptops. The method that is best suited depends on the number and size of the files to be transferred. In both cases you would use a browser to Login into https://www.globus.org, as described above, and open the UGA GACRC Collection in the File Manager panel.
Small number of files or small sizes downloaded or uploaded
Uploads - Once you open the UGA GACRC Collection in the File Manager panel, you can select the "Upload" button to upload a file from your local machine to the UGA GACRC Collection, to the path you select (e.g. your Sapelo2 /scratch dir).
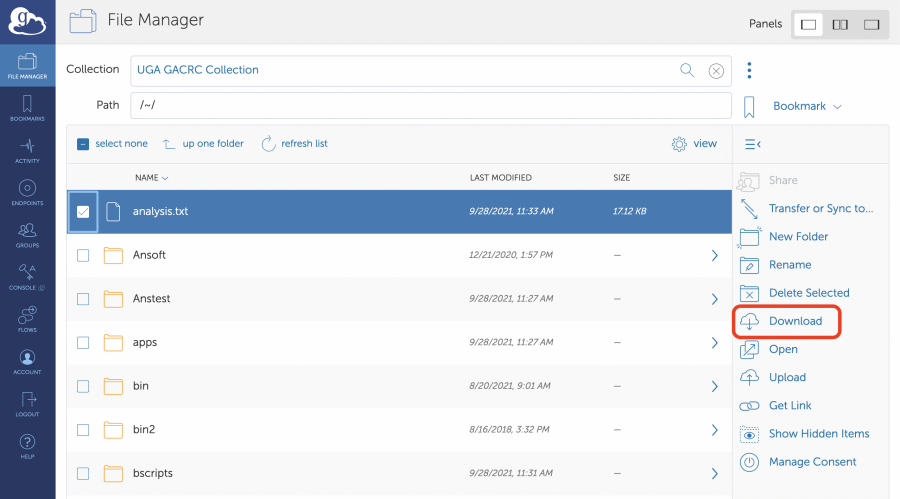
Downloads - Once you open the UGA GACRC Collection in the File Manager panel, you can navigate to the directory where the files are located and select the files you want to download. Then select the "Download" button to download the file(s) to your local machine.
Here is a sample screenshot to download a file called analysis.txt from the user's home directory on Sapelo2 to the local machine:
File Size Limitations - While Globus itself does not impose strict limits on file sizes, some web browsers may have upload limits, typically around 1-2 GB. If you attempt to upload files larger than 1 GB, you may encounter issues with data transfer. For larger file transfers, it is recommended to use Globus Connect Personal (GCP) instead of the web browser interface, as GCP handles larger files more efficiently. Please refer to the instructions in the Many Files or Large Files section below.
You do not need to install Globus Connect Personal on your local machine in order to use the Download and Upload features, to transfer files from e.g. the UGA GACRC Collection to your local machine. Please note that not all Collections have the Download and Upload feature. If this feature is not available, you can follow the instructions in the Many files or large files section below.
Many files or large files
Install Globus Connect Personal (GCP) and create a Globus endpoint on your local machine. Globus Connect Personal allows faster and more reliable file transfers. Information on how to install GCP on your local machine and create an endpoint are available on the Globus Connect Personal page.
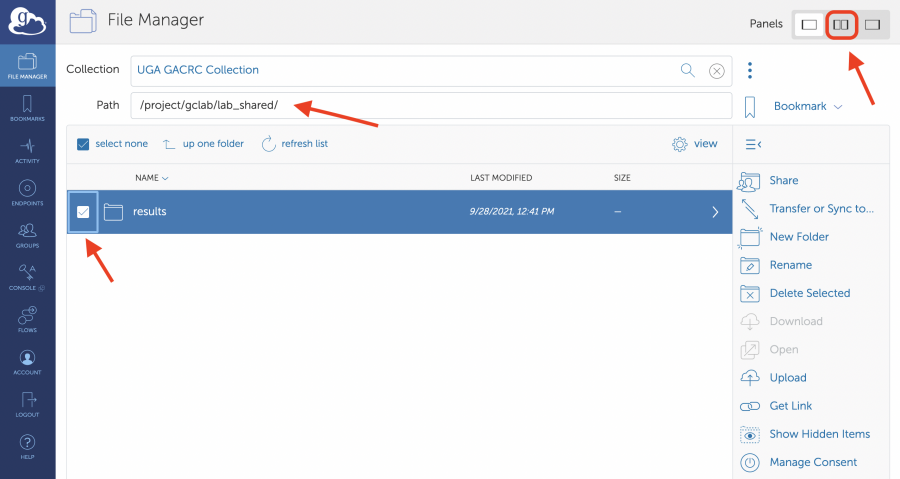
Once you have installed GCP and created an endpoint on your local machine, navigate to the UGA GACRC Collection in the File Manager panel, select the files or directories you wish to transfer, and click on the double panel icon (top right), as illustrated here:
On the right panel, enter the name of the Collection on your endpoint (e.g. called shtsai-imac in this example) and select the path where to transfer the data to (or from). By default, file integrity will be checked after the transfer is completed. You can enable other options (e.g. file encryption on transfer) by opening the Transfer & Sync Options menu and selecting the options you wish to use. Once all the settings are chosen, and you are ready to perform the file transfer, click on the Start button. You can check the status of the transfer by going to the Activity panel.
Transfer files from/to an external hard drive
It is possible to use Globus to transfer files between an external hard drive connected to your local machine and another system, such as a GACRC storage area. The first step is to install Globus Connect Personal (GCP) on your local machine. Information on how to install GCP on your local machine and create an endpoint are available on the Globus Connect Personal page.
After you connect your external hard drive to your computer, you will need to add it to the list of Accessible Folders within the Globus Connect Personal application. Documentation on how to do that from Window and Mac are at
https://docs.globus.org/how-to/globus-connect-personal-windows/#configuration
https://docs.globus.org/how-to/globus-connect-personal-mac/#configuration
Then you should be able to transfer files from the external drive to a GACRC storage (or vice-versa) via Globus.
Transferring files between Sapelo2 file systems
To transfer files between two files systems on Sapelo2, navigate to the File Manager two-panel view, and select UGA GACRC Collection on both panels. Enter the path to the location of the files on one panel (e.g. your /project directory) and the location where you want to transfer the file to on the other panel (e.g. your /scratch directory). Select the files to transfer and click Start. You can check a report of the transfer by going to the Activity panel.
Here is an example where a directory called inputdata is transferred from a /project directory to a /scratch directory:
Access Storage Not Hosted by GACRC
Globus can be used to access, share, transfer, or manage data stored on devices outside of the GACRC. The steps described above can also be used to access and transfer data from any endpoint that has been shared with you (for example, shared by a collaborator in another institution). You can either search for an endpoint in the File Manager panel, or go to the Endpoints panel and select Shared with you to see a list of Collections shared with you.
You can transfer files into your Sapelo2 file systems by using the UGA GACRC Collection and selecting the appropriate directory (e.g. your /home, /scratch, or /project directories).
Collaborators can share data with you by sharing a Collection or an endpoint with you. The shared Collection/Endpoint can be on another institution, on a desktop or laptop, or on their GACRC storage. Once you login into https://www.globus.org, you can view all Collections/Endpoints shared with you by clicking on Endpoints on the left side of the page and then open the Shared with you tab. A list of endpoints that have been shared with you will be listed on the page.
You can transfer data from shared endpoints to you desktop or laptop, or directly into your GACRC storage (e.g. your /scratch area or your group's /project area). You can transfer files into your Sapelo2 file systems by using the UGA GACRC Collection and selecting the appropriate directory (e.g. your /home, /scratch, or /project directories).
Sharing Data
Globus can be used to share data from your local machine or your GACRC /project area.
Sharing data from GACRC storage (/project)
You can allow collaborators to download or transfer files from your /project area into their local endpoints/collections or into their GACRC storage space in the UGA GACRC Collection. Your collaborators do not have to be associated with an institution that has a Globus subscription. They can login into https:///www.globus.org using a Globus ID, a Google Account, an ORCID ID, or with their institutional account if their institution has a Globus subscription.
Steps to share a /project folder with a collaborator:
1. In the File Manager panel, open the UGA GACRC Project Sharing collection.
2. Navigate to the folder you wish to share (e.g. /project/abclab/shareddir) and select it.
3. Select Share and create a guest collection.
4. Add permissions to share the collection with your collaborators (they will need to have a Globus account, as indicated above).
Note that your collaborators will not be able to transfer files into your shared Collection on /project, even if you choose to add write permission while sharing the Collection.
If you would like your collaborators to transfer data into your GACRC storage for you to use on the cluster, please contact GACRC and we will set up a space where they can write into.
To obtain the data you shared with them, your collaborators can do as follows:
a. If you are only sharing a few small files, they can navigate to the File Manager panel in the Globus page (available after they login into https:///www.globus.org), open the collection you shared with them, select the files and use the Download option.
b. To copy large files or a larger number of files to their desktop or laptop, they should install Globus Connect Personal on their local machine.
c. If your collaborators are GACRC users, they can transfer the data into their GACRC storage, using the UGA GACRC Collection. This use case does not require that they install Globus Connect Personal on their local machine.
Sharing data from your desktop or laptop
If you have a need to share data from your desktop or laptop using a Globus Connect Personal collection, please request to join the University of Georgia Standard (HA) Globus subscription with these steps. Note this is not required for normal Collections/Endpoints provided by GACRC.
- Click on Settings
- Choose the Subscriptions tab
- Click "Find a Subscription" and choose University of Georgia Standard (HA)
- Fill out the information and submit your application
Once your request is approved, Globus Plus will allow you to create shared links to your own Globus Connect Personal client. These are also known as guest collections. Please note that if you allow write access to your Collection, your local hard drive can be inadvertently filled or files stored there could be deleted. Please see the Globus Connect Personal page for more information.
If you don't have a collection set up on your local computer yet, please first set one up following the steps detailed here.
Make sure that your collection on your local computer is set to be "shareable" with the following steps:
- Open the Globus Connect Personal application
- Click Preferences > Access
- Check the box under "Shareable" next to your user directory (i.e. /Users/yourname)
Sharing data from a multi-user system
If the data are stored (or will be stored) on a multi-user system, you can install Globus Connect Server and create an endpoint on this system. Please contact GACRC to request that your endpoint be associated with UGA's Globus subscription. Once your endpoint is listed in UGA's subscription, you will be able to share it.
Summary of Collections on GACRC storage
- UGA GACRC Collection (All GACRC filesystems) – GACRC Users Only: This collection allows you to access data on your Sapelo2 /home and /scratch directories, as well as your group's /work and /project areas. You can use the Upload and Download features (recommended for a few small files) or transfer large files and/or a large number of files from/to a different endpoint.
- UGA GACRC Project Sharing (Read Only): You can use this collection to share a directory with a collaborator. The data to the shared needs to reside in your group's /project folder and you can select a directory to create a shared collection. Anyone with whom you share the collection will be able to copy the shared files (even if the files don't have Unix read permission open for group or for others), but they will not be able to write into your shared collection.
- UGA GACRC read-write Sharing: This collection has read-write access to allow external (to UGA) users to upload data to GACRC storage for a UGA user. Please contact GACRC if your external collaborator needs to upload data onto GACRC storage for you to use (upon request, GACRC staff will configure a space for you).
Globus Command Line Interface
The Globus Command Line Interface (CLI) provides an interface to Globus services from the shell, and is suited to both interactive and simple scripting use cases. The CLI can be used to integrate Globus actions into your scripts to automate your data flows.
To use it on Sapelo2, you need to load the module first, for example, to use version 2.1.0, load the module with
ml Globus-CLI/2.1.0-GCCcore-8.3.0
For more information, please see the Globus-CLI page.
